Procedures
Teach your AI agent to handle a specific customer scenario as one ordered list of steps, decisions, skills and quick replies.
A procedure is one customer scenario, handled end to end. It's the answer to "when someone asks about X, here is exactly what I want you to do" — and it's the difference between an agent that improvises and one that follows your process.
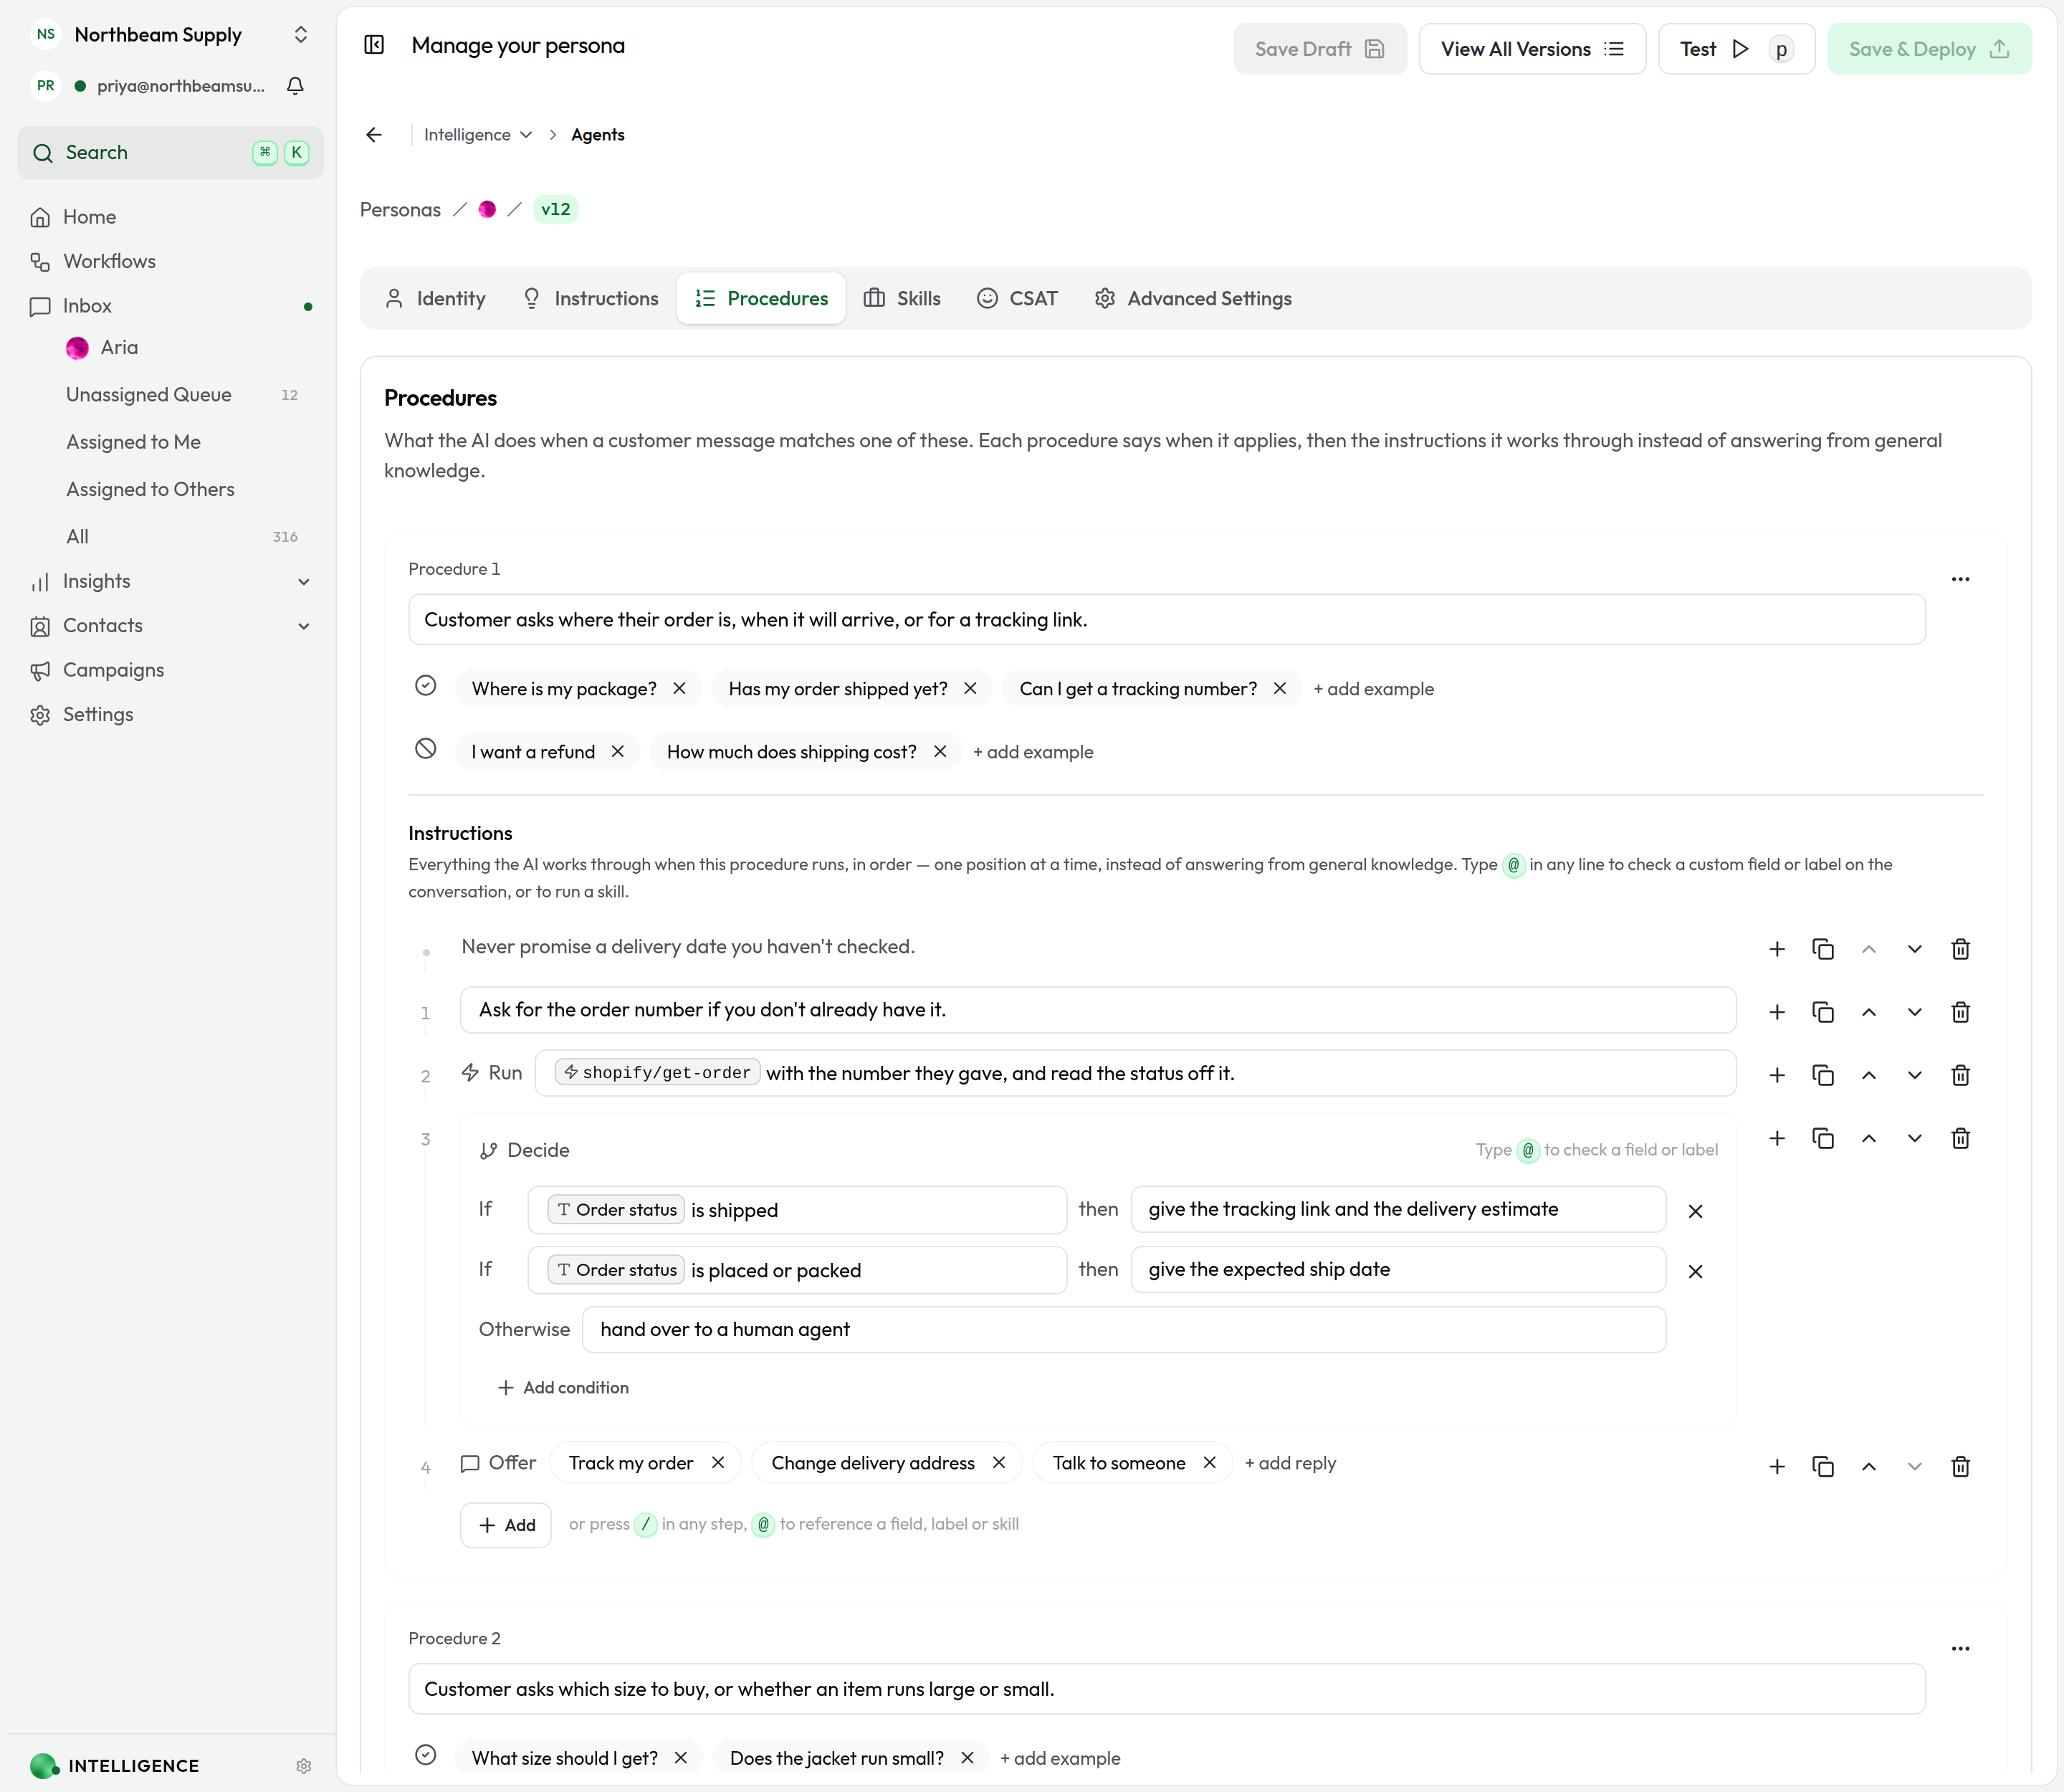
Procedures live on the Procedures tab of your AI Persona (Intelligence → Agent). Each one has two halves:
- When it applies — a description of the situation, plus optional example messages
- What happens then — one ordered list of instructions the agent works through
Use a procedure when a conversation needs more than a plain text answer — for example, asking for an order number, looking the order up with a skill, and then offering "Track my order" and "Talk to someone" buttons.
Because the instructions are one ordered list, a procedure can say when a skill runs and when buttons are offered, not just that they exist.
Procedures were previously called instruction blocks. Same feature, clearer name — nothing you wrote needs changing.
Procedures vs. plain instructions
Your agent's instructions can include regular text and procedures. Both are valid — use the right tool for the job.
| Use plain instructions for… | Use a procedure for… |
|---|---|
| General tone and policies | A specific situation with a clear trigger |
| Rules that always apply | Clickable quick replies customers can tap |
| Background guidance | Running a particular skill at a particular moment |
Plain text outside a procedure still shapes how your agent behaves. Procedures add matching (so the right scenario fires) and order (so things happen at the right point).
The two live on different tabs. The Instructions tab is for the general guidance; its editor shows only that. Underneath it, a line tells you how many procedures you have and links to the Procedures tab, which is where every procedure is written.
Add a procedure
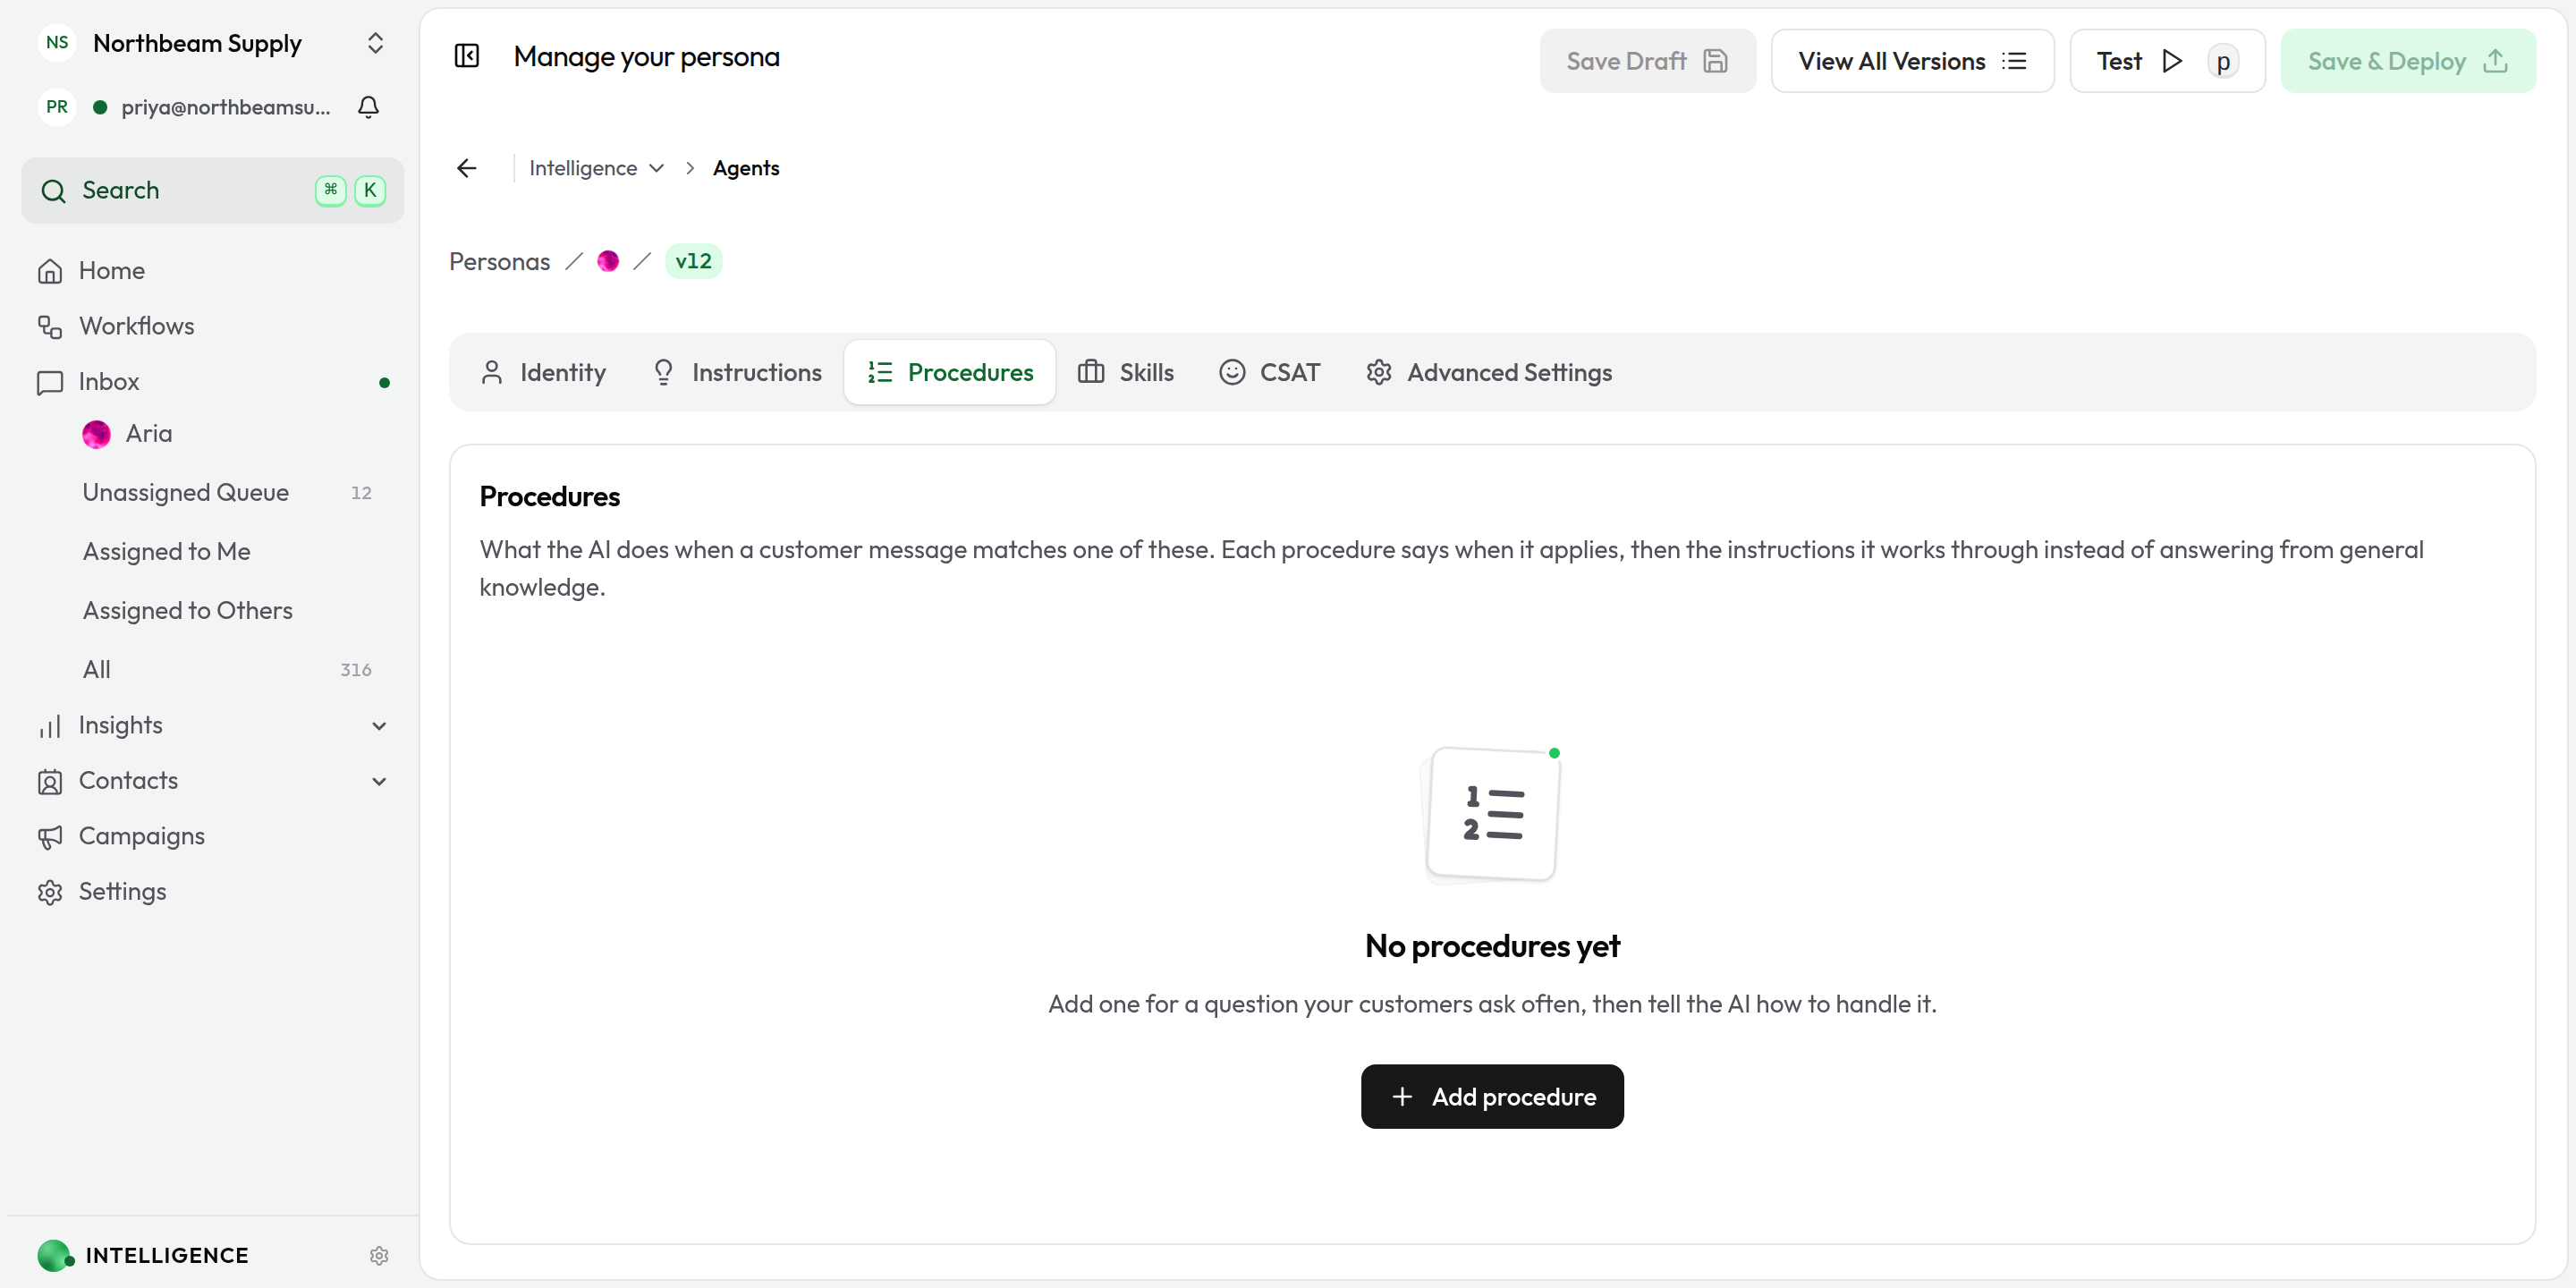
A persona with no procedures yet opens on this:
1. Open the tab
Go to Intelligence → Agent, select your AI Persona, and open the Procedures tab.
2. Add one
Click Add procedure. A new, empty procedure appears at the bottom of the list, opened on its first step.
3. Fill it in, top to bottom
That's the order your agent reads it: first when this applies, then what happens.
4. Save and test
Save your changes, try it in the playground, then deploy when you're happy. Customers only ever see deployed versions.
To remove one, open its ⋯ menu and choose Delete procedure.
When the procedure applies
The description
The field at the top of the card is the most important one — it tells your agent which customer situations should activate this procedure.
Write a full sentence describing the situation in plain language:
Customer asks where their order is, when it will arrive, or for a tracking link.
The description is required. If you leave it blank, matching will be unreliable.
For detailed guidance on writing descriptions — including how to avoid overlaps between procedures — see Writing Block Descriptions.
Example messages (optional)
Directly below the description are two optional lists. Each example you add becomes a chip:
- Positive examples (tick icon) — add a message that should trigger this
- Negative examples (ban icon) — add a message that should not trigger this
These sharpen matching when the description alone isn't enough. Add a few natural phrases from real conversations — the way customers actually write.
Limits: up to 20 examples per side. Keep each one short — one or two sentences at most.
The instructions
Below the examples, Instructions is one ordered list of everything the agent works through when this procedure runs. It goes through the list one position at a time instead of answering from general knowledge.
Add an entry with the Add button at the bottom, or press / in an empty step. Both open the same menu of five kinds:
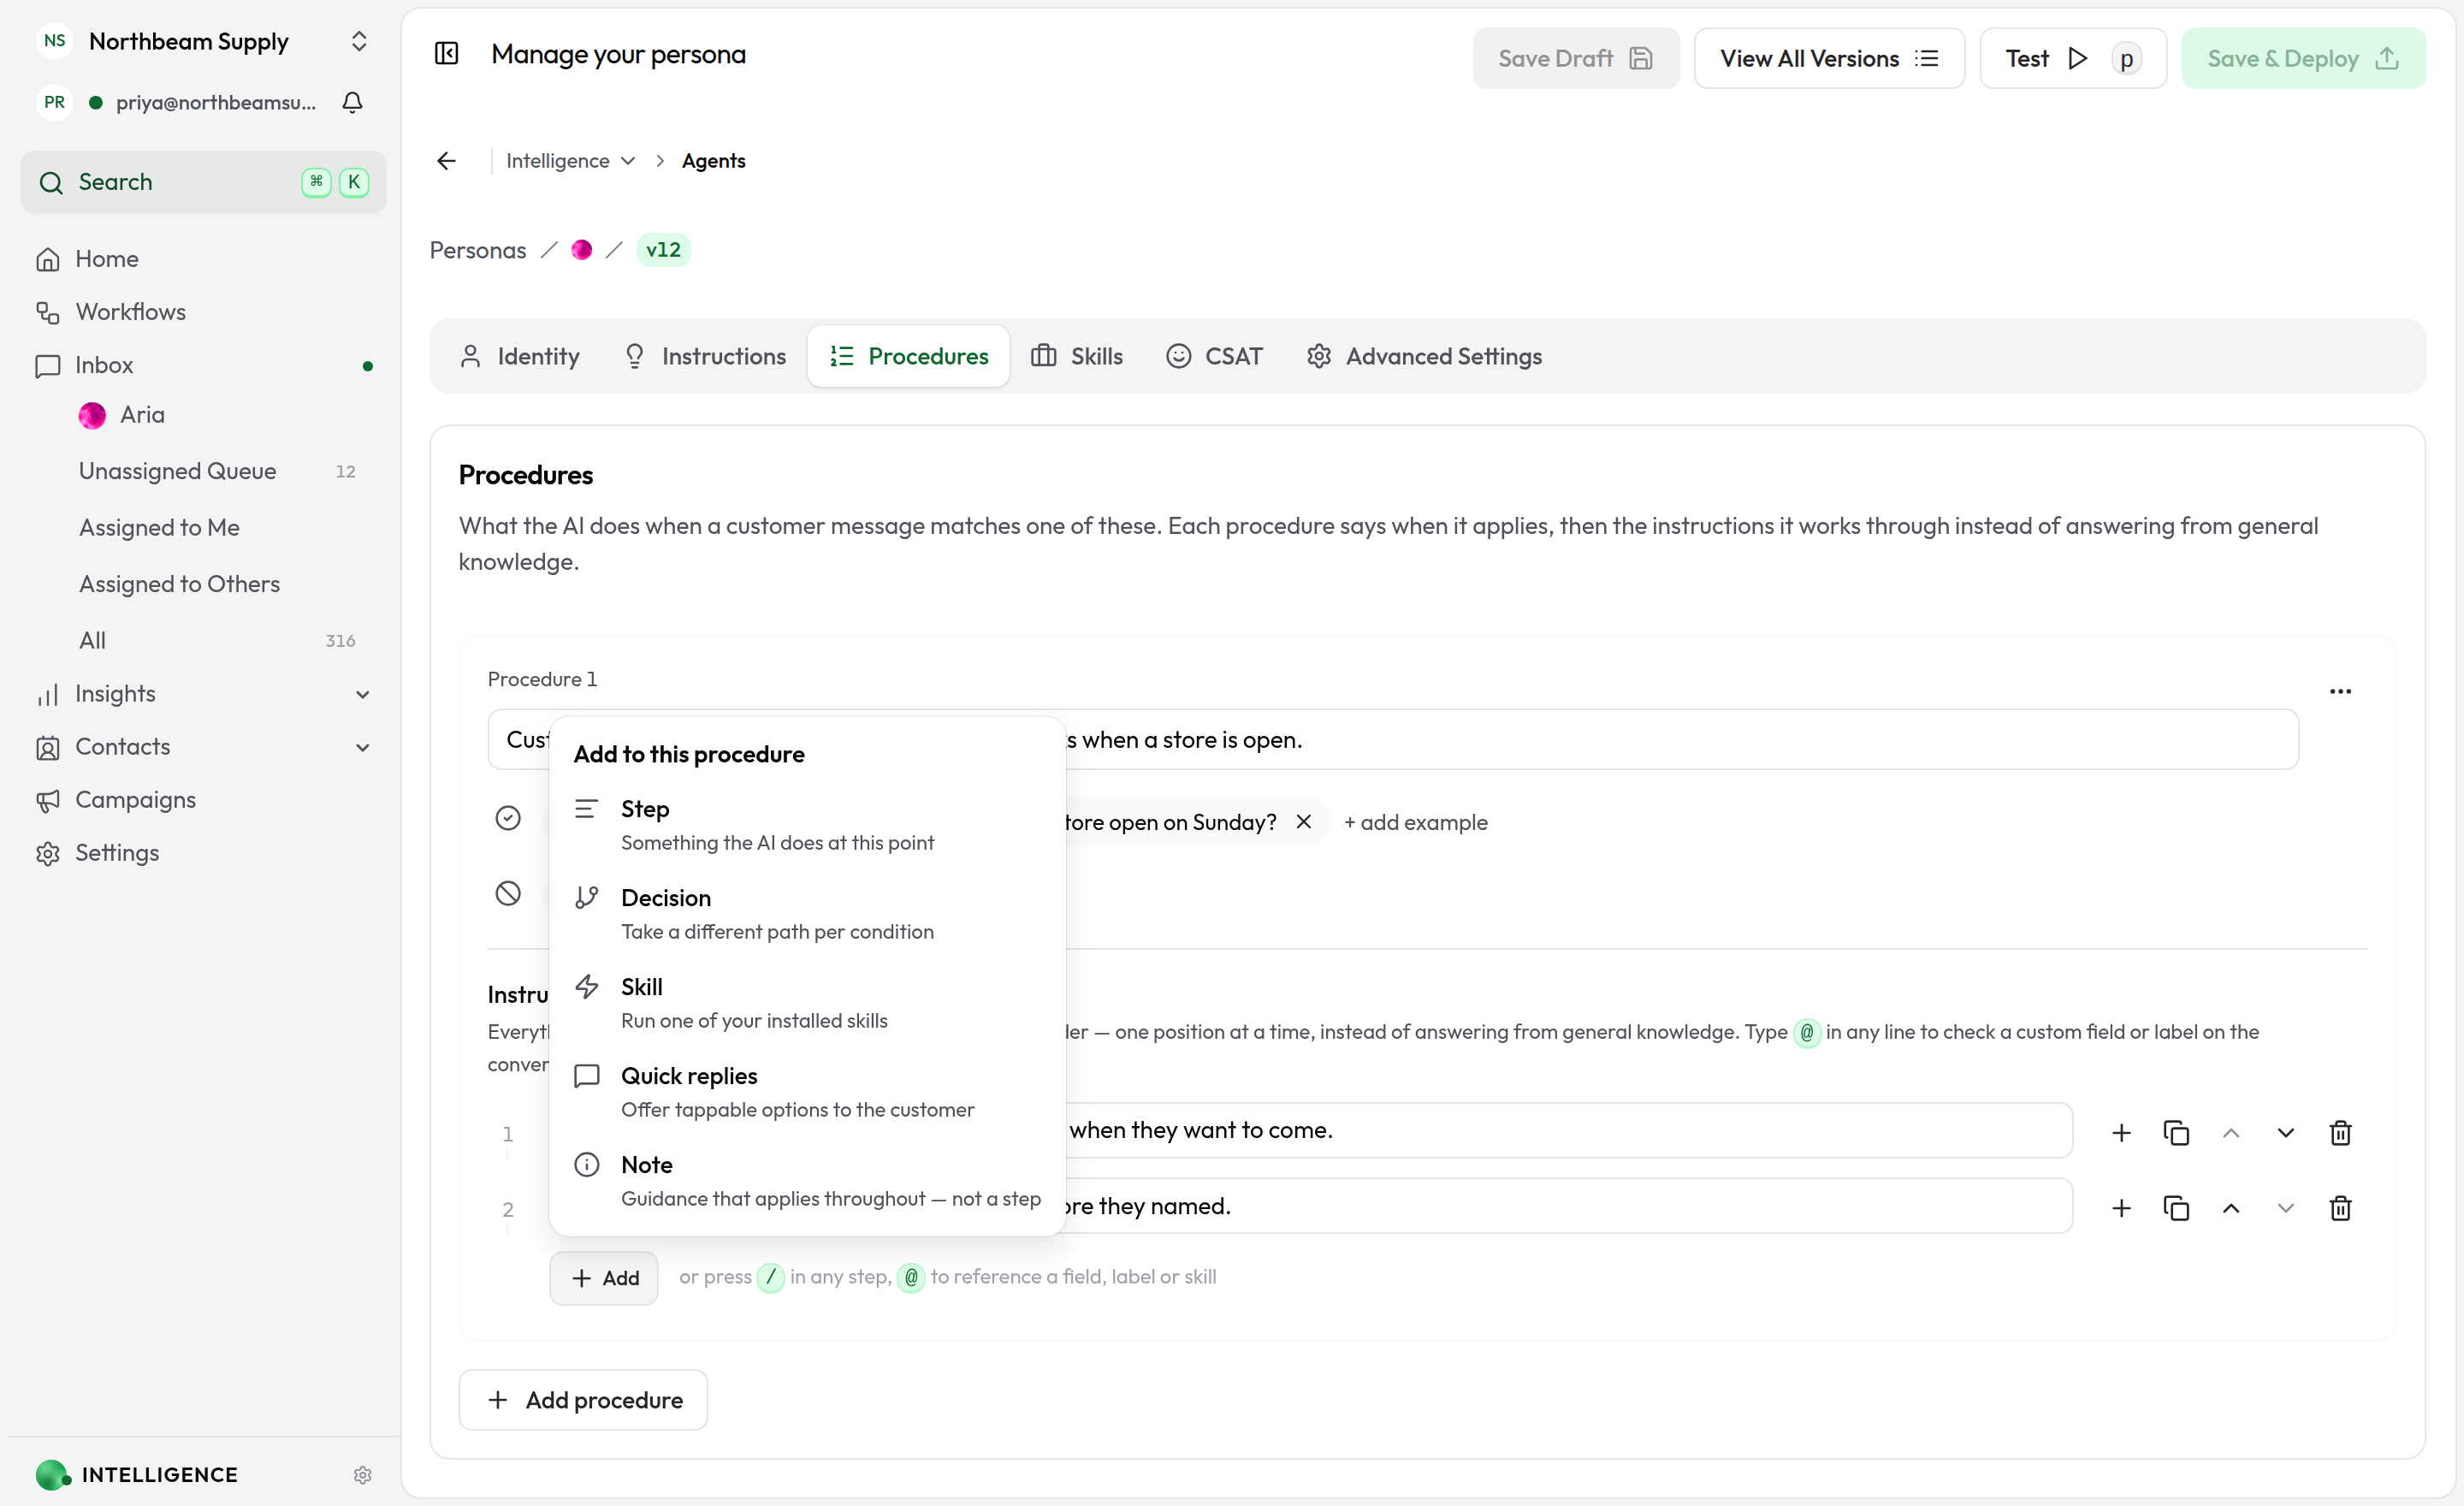
| Kind | What it's for |
|---|---|
| Step | Something the AI does at this point |
| Decision | Take a different path per condition |
| Skill | Run one of your installed skills |
| Quick replies | Offer tappable options to the customer |
| Note | Guidance that applies throughout — not a step |
Ordering entries
Entries are numbered on a rail down the left. Only positions get a number — a Note doesn't, because it isn't a point in the flow.
Every entry carries its controls on the right:
- + — insert a new entry directly after this one
- Copy — duplicate it, in place
- ↑ and ↓ — move it up or down
- Bin — remove it
While you're typing a Step, pressing Enter commits it and opens the next one, so you can write a whole sequence without touching the mouse. Backspace in an entry that's already empty removes it and puts your cursor back in the one above.
Order is the point. A skill placed at 2 runs after the step at 1; quick replies placed at 4 are offered once the customer has an answer. Move them and the agent's behavior moves with them.
Step
A single instruction — Ask for the order number. It's the entry a new procedure starts on, and the one you'll use most.
Decision
A fork in the procedure. Each row reads If … then … — for example, If the order has shipped, then give the tracking link.
Click Add condition for another row, up to 5 in one decision. The Otherwise field at the bottom is optional; use it for what should happen when none of the conditions hold.
A decision counts as one position however many conditions it has — the agent makes one choice there.
Decisions are where references earn their keep: If the order has shipped is a description of a condition, while If Order status is shipped is one the agent can actually check.
Skill
Runs one of your organization's skills at this point in the procedure — checking an order, booking an appointment, looking something up.
Type @ and pick the skill from the list, then keep typing to say what to run it with or what to do with the result — it's all one sentence: @get-order using Order number, then confirm the address.
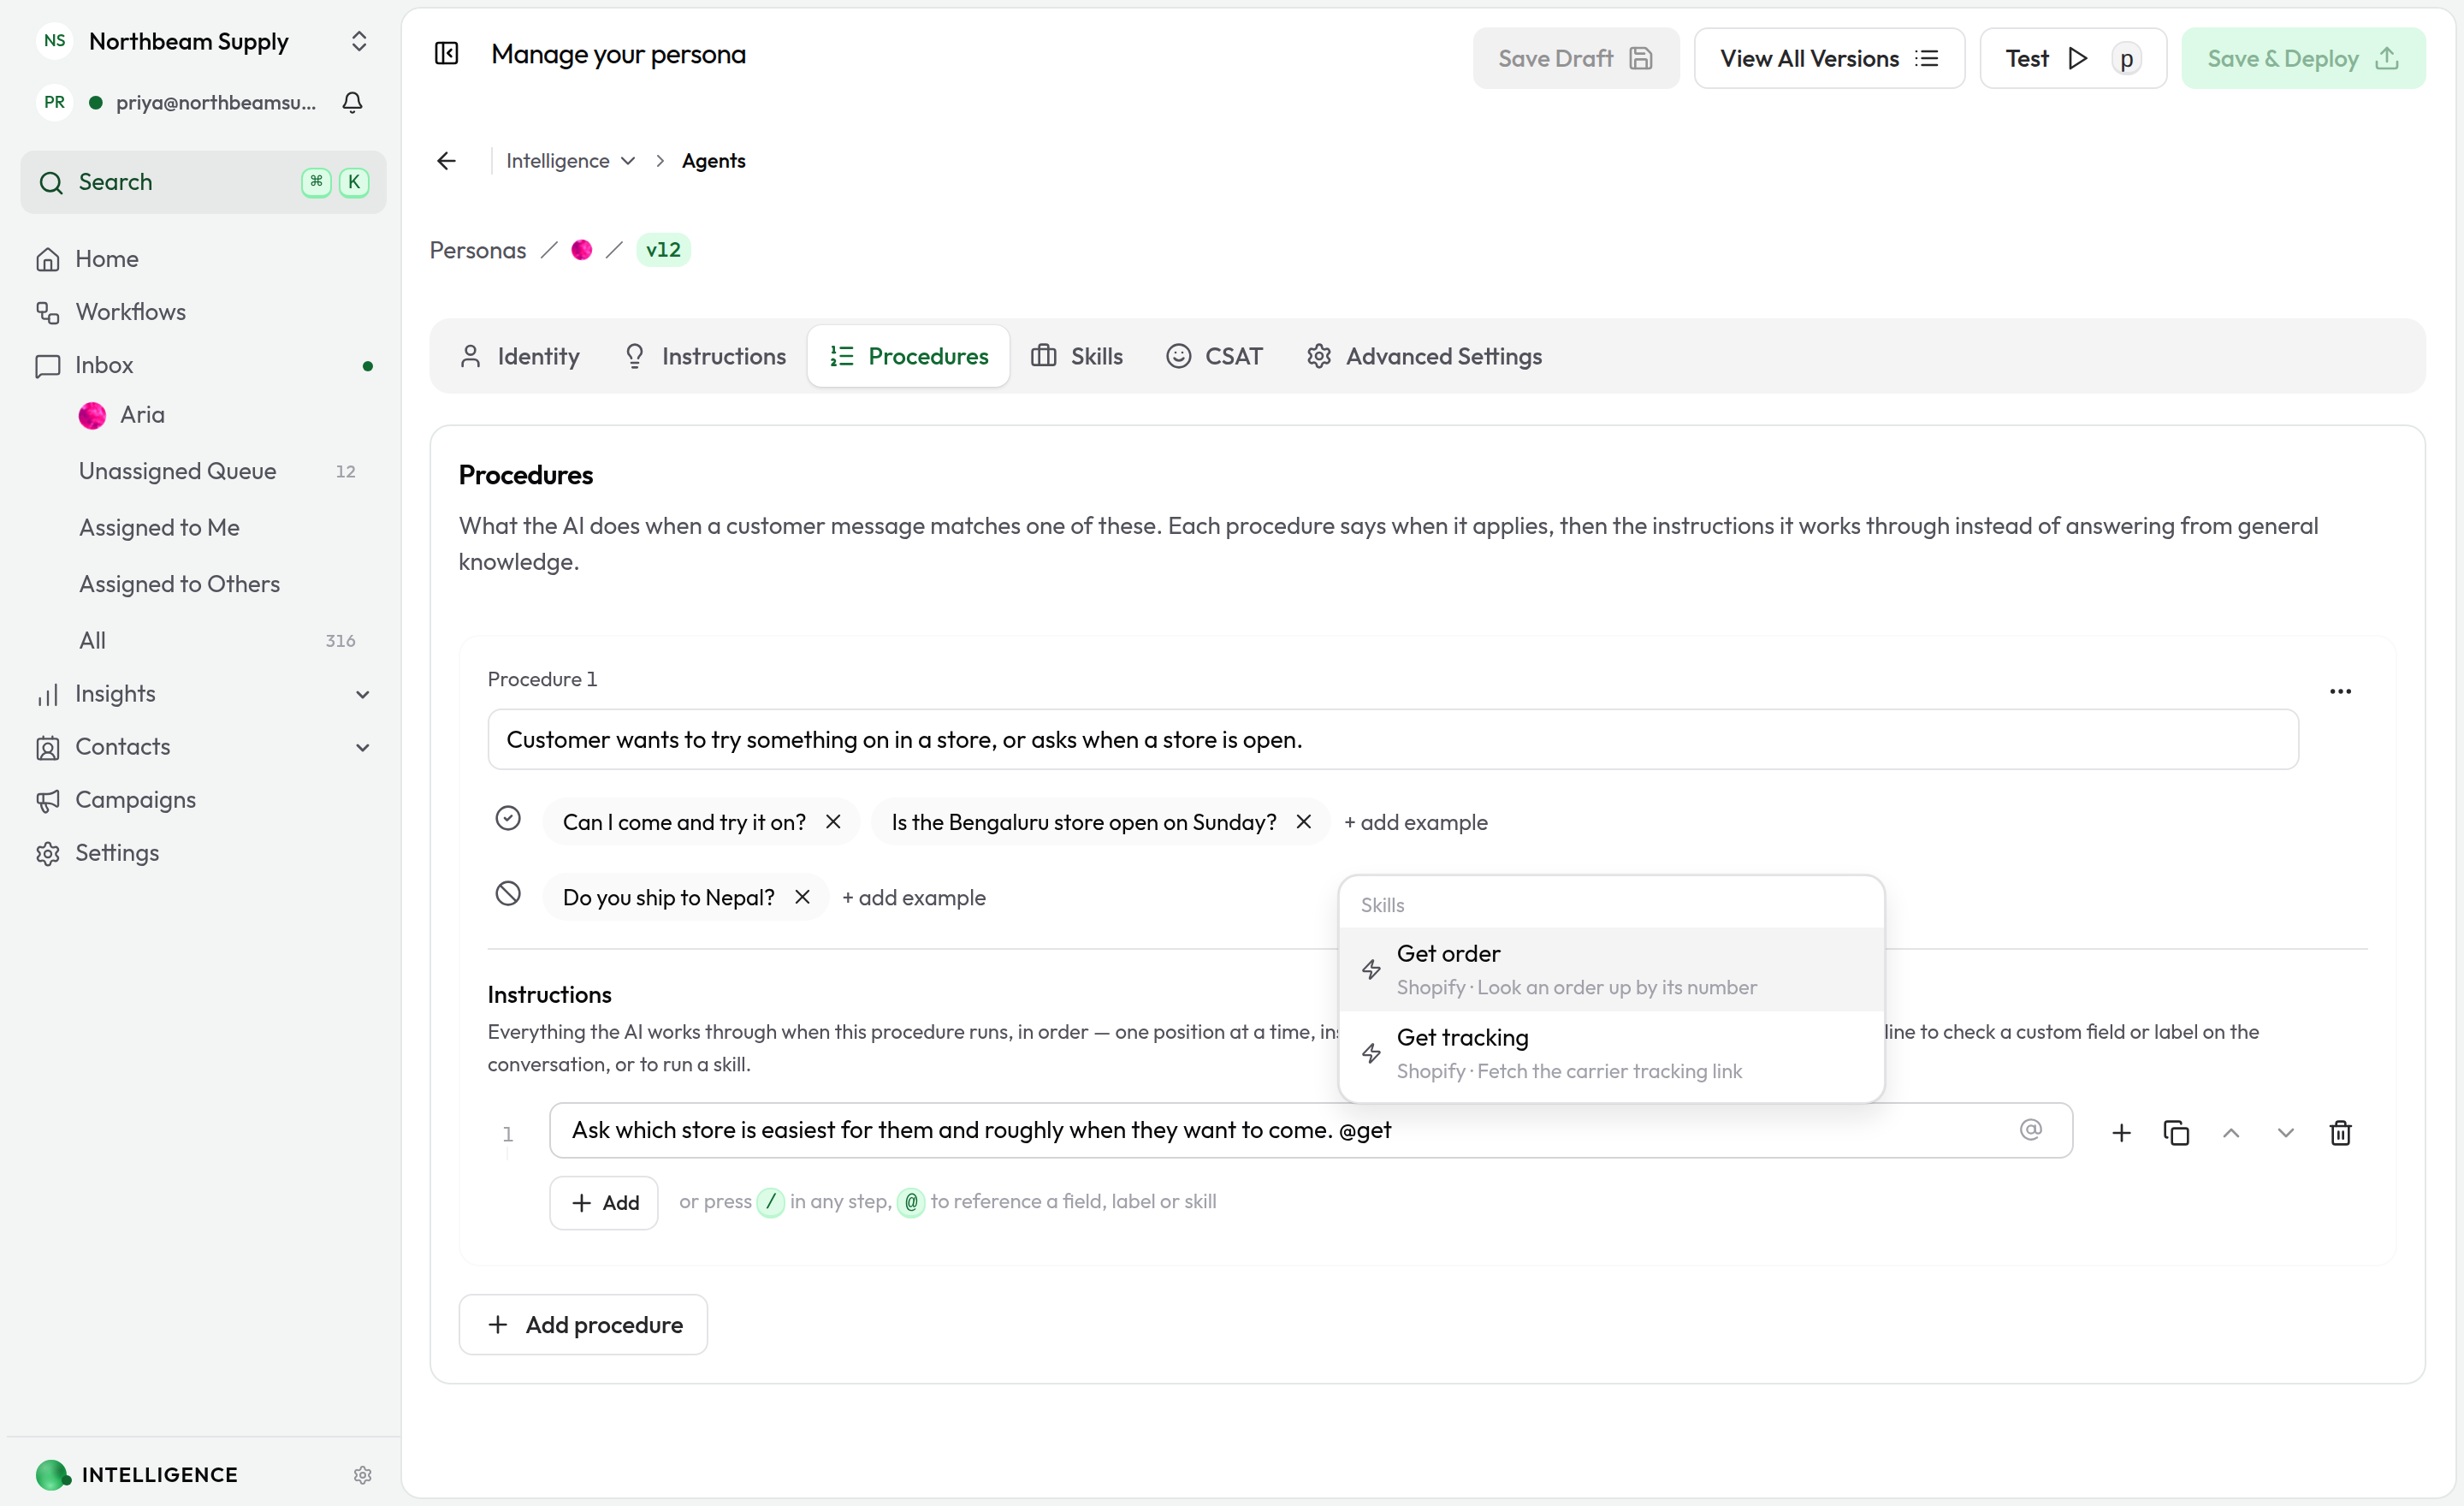
Each skill is listed with the set it came from, because two sets can both provide a "Get order". Only skills your organization has installed are offered; if the list has none, install what you need from Intelligence → Skill Sets first.
An entry that names no skill is just a step, and saves as one.
You can also name a skill anywhere else — inside a decision arm, for instance (if it has shipped, then run @get-tracking). Wherever it appears, the agent gets that skill for the turn.
Quick replies
Tappable buttons your customers see beneath the agent's message — "Track order", "Change address", "Speak to a team member". They're offered at the point in the procedure where you put this entry.
Click + add reply and fill in two fields:
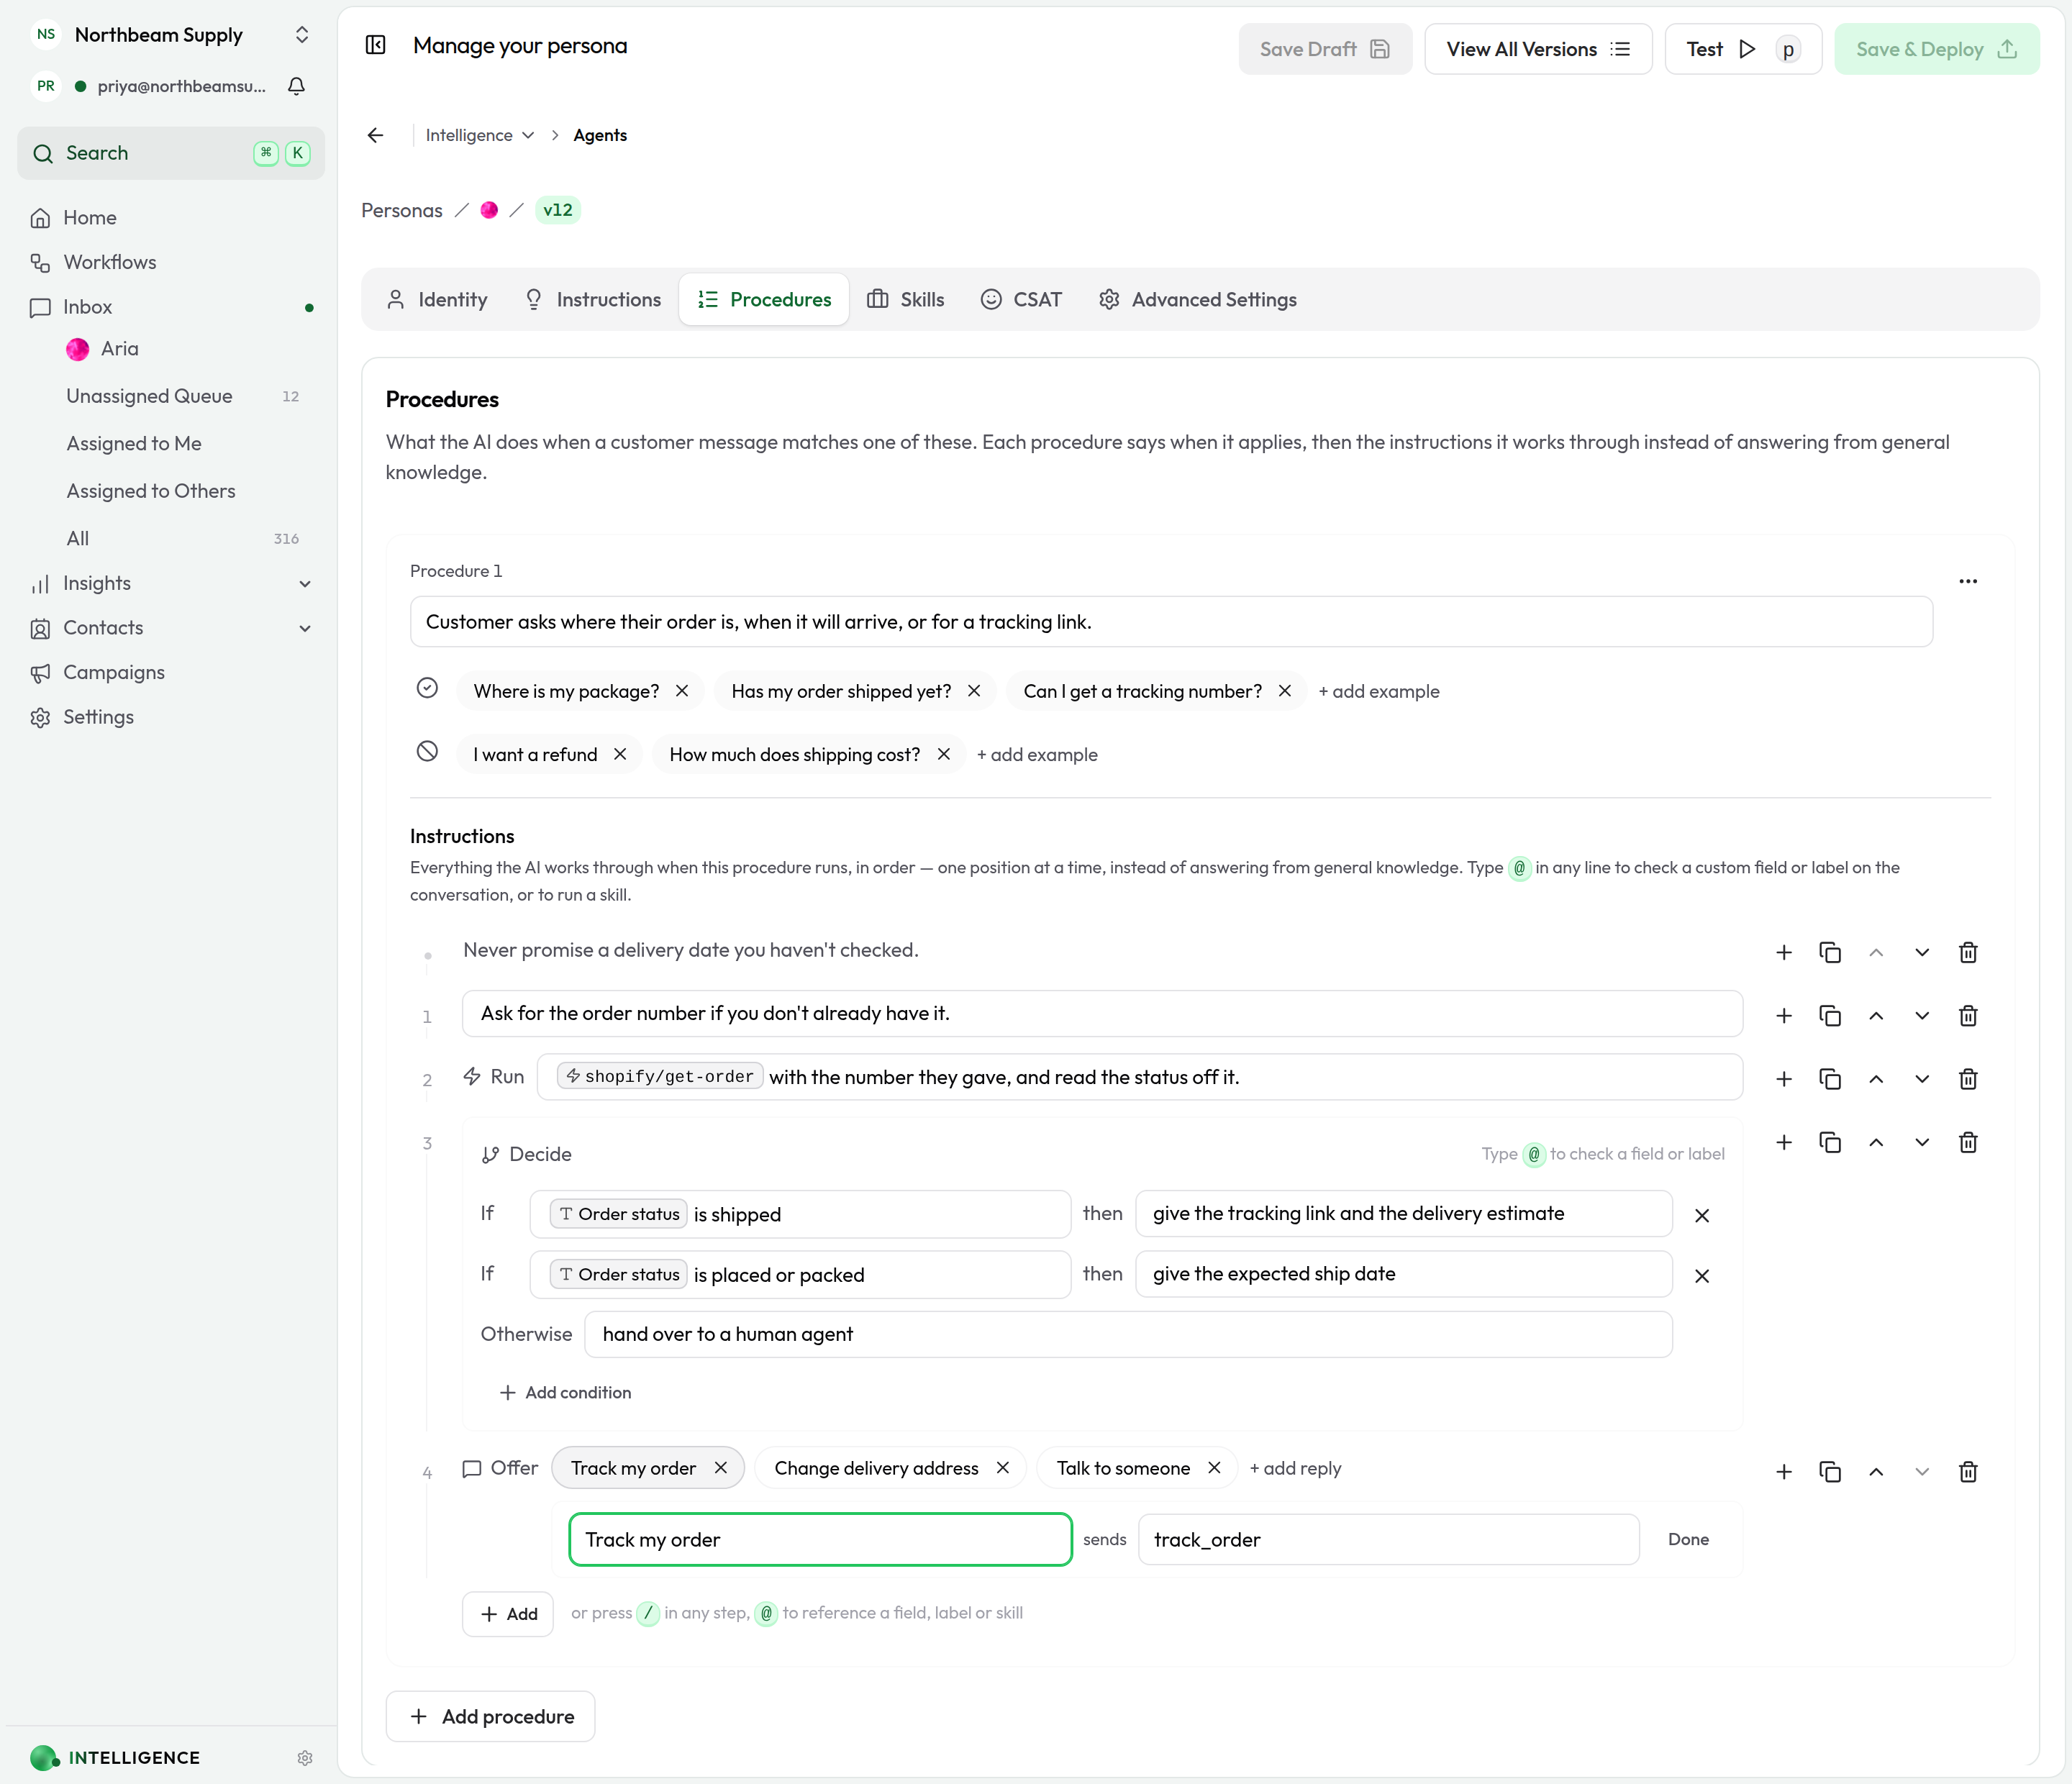
| Field | What it is | Tips |
|---|---|---|
| Label | The text on the button — what the customer sees | Keep it short and action-oriented. |
| Message | What comes back when the customer taps it | Starts out matching the label. Change it when the label alone isn't enough for the agent to tell the options apart — for example, track_order vs. cancel_order. |
Click Done and the reply collapses into a chip. Click a chip to edit it again, or the × on it to remove it. One entry holds up to 10 replies.
When a customer taps a button, your agent receives the message as context, so it knows which option they picked even if two labels look alike.
A procedure needs at least one Quick replies entry before it can offer buttons of its own. Procedures made only of steps, decisions, skills and notes still guide your agent — they just won't surface buttons.
Note
Guidance that holds for the whole procedure rather than at one point — never promise a delivery date you haven't checked, keep replies to two sentences. This is where the rules go, as opposed to the work.
Notes aren't numbered and don't count toward the step limit, so a procedure with a lot to say about how to behave doesn't get fewer things to do.
Referencing the conversation
Type @ anywhere in a step, a decision or a note to point at something the conversation itself holds. Pick from the list and it drops in as a chip:
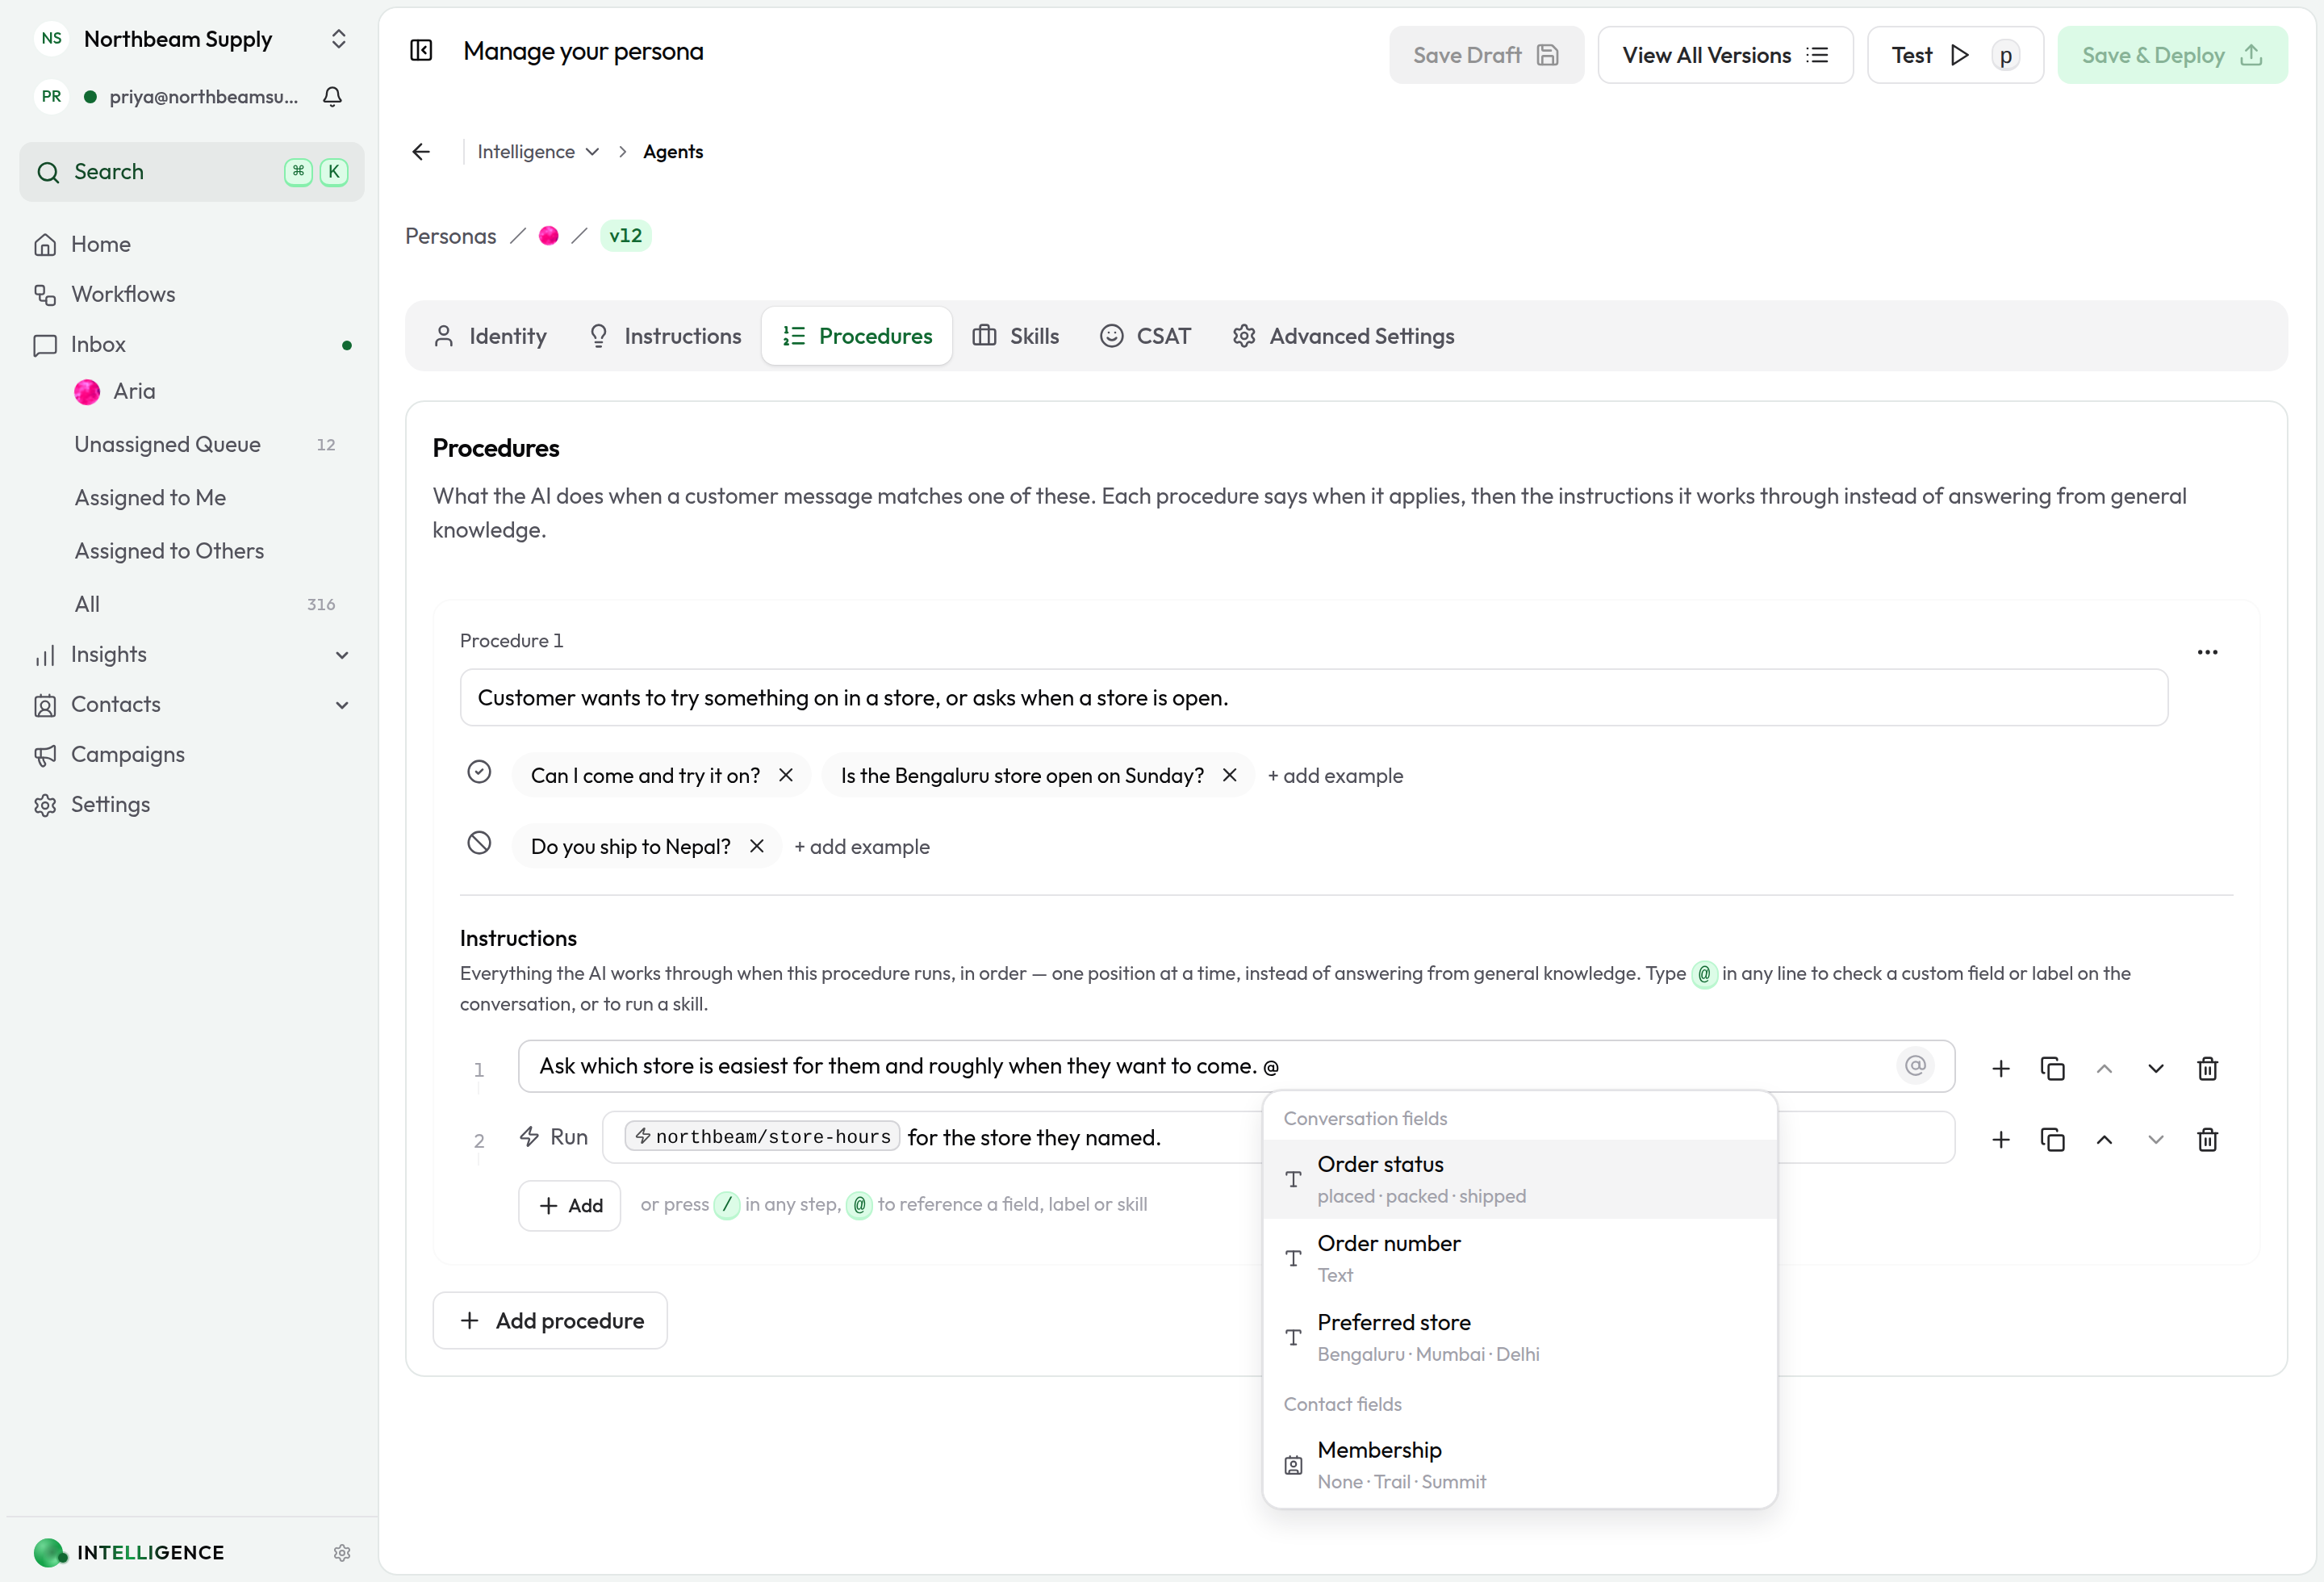
The list is grouped, in this order — scroll for the ones below the fold:
| Group | What it refers to |
|---|---|
| Conversation fields | A custom field captured on this conversation — Order status, Budget |
| Contact fields | A custom field on the contact's record, carried between conversations — Membership, Usual size |
| Labels | Whether a label is on this conversation — VIP, At risk |
| Skills | One of your installed skills to run |
This is what turns a description of a condition into a condition your agent can actually check:
| Without a reference | With one |
|---|---|
| If the order has shipped, then give the tracking link | If Order status is shipped, then give the tracking link |
| If they're an important customer, then skip the queue | If VIP, then skip the queue |
When the procedure runs, each chip is expanded into what this conversation currently holds — the "Order status" field (currently: shipped), the "VIP" label (applied to this conversation) — and the agent decides on that. A field with nothing in it yet expands to (not set yet), so the agent knows to ask rather than assume.
References use the field or label's name. Rename one and existing procedures keep reading correctly — they just stop checking a value until you repoint them. A chip whose field or label no longer exists turns red so you can spot it.
Limits
| Limit | Value |
|---|---|
| Numbered positions per procedure (steps, decisions, skills, quick replies) | 15 |
| Notes per procedure | 10 |
| Conditions in one decision | 5 |
| Replies in one Quick replies entry | 10 |
| Characters in a single field | 400 |
| Example messages per side | 20 |
A procedure with no positions still matches and still supplies its notes — it just has no checklist to follow.
Quick replies from procedures vs. from skills
Buttons can come from two places. They look the same to customers, but you configure them differently:
| Source | Where you set it up | When customers see it |
|---|---|---|
| Procedure quick replies | A Quick replies entry in the procedure's Instructions | When this procedure matches, at the point you put the entry |
| Skill output buttons | The skill's definition in Skill Sets (or in the skill's handler response.buttons) | After the skill runs and returns them |
Priority: if a skill already returned buttons in the same turn, those are shown as-is — the agent won't swap them for a procedure's quick replies. Procedure buttons are used when no skill has offered buttons yet.
Use procedure quick replies for fixed choices tied to a scenario ("Track order", "Talk to someone"). Use skill buttons for follow-up actions that depend on what the skill found ("View invoice", "Reschedule").
How a procedure is chosen
You don't need to configure matching manually — but understanding the basics helps you write procedures that fire reliably.
- Your agent reads the conversation and compares the moment against every procedure's description and example messages.
- It needs to be confident, and it needs a clear winner. A weak match won't steer the reply, and neither will two procedures that score almost the same — when the choice is a coin flip, the agent would rather answer normally than pick the wrong process.
- When one procedure wins, the agent works through its instructions in order — running the skills and offering the quick replies where you placed them. While the procedure is running, the skills it can reach are narrowed to the ones that procedure names, so the rest of your workspace's tools can't distract it. Searching your knowledge base and handing over to a human stay available throughout: a customer is under no obligation to stay on the path you wrote.
- If nothing wins clearly, the agent replies without a procedure. It won't guess.
That's why clear descriptions, distinct boundaries between procedures, and well-chosen example messages matter. Overlapping procedures or vague descriptions are the most common reason quick replies don't appear when you expect them.
How a procedure runs
A procedure isn't one reply — it's a thread the agent keeps hold of across several messages.
- It remembers where it got to. When a procedure starts, the agent tracks which position it's on, so the next customer message continues from there rather than restarting at 1.
- It stops when the work is done. Once the agent finishes the final position, the run closes.
- It lets go when the customer moves on. If a later message clearly matches a different procedure, the agent switches to that one. If the customer changes the subject, or the conversation is handed to a human, the run is abandoned rather than being forced to completion.
- It won't get stuck. A run that has gone on for too many turns, or that started more than a day ago, is dropped so it can't keep steering replies toward a checklist nobody is following.
- Editing is safe mid-conversation. If you delete a procedure while a conversation is part-way through it, that run is closed instead of half-applied.
A procedure made only of notes has nothing to advance through, so it isn't tracked this way — it still matches and still supplies its guidance.
Test before you deploy
Open the playground (Test) and send the kind of message the procedure is meant to catch.
When a procedure fires, the playground takes you to the Procedures tab and rings the card that ran — so you can see straight away whether the right one matched, and jump into it if it didn't.
The playground tests the persona as you have it on screen, unsaved edits included — so you can try a change before committing to it. Customers only ever see the version you Save & Deploy.
Tips for well-configured procedures
- One scenario per procedure. Don't combine "cancel subscription" and "upgrade plan" — split them.
- Write descriptions as situations, not labels. "Refunds" is too vague; "Customer asks for a refund or says they were charged incorrectly" is actionable.
- Put each entry where it belongs. Ask yourself what the agent knows at that point — a skill that needs the order number can't run before you've asked for it.
- Notes for rules, steps for work. If it applies throughout, it's a note. If it happens at a moment, it's a position.
- Make quick reply labels customer-friendly. Write what they'd tap, not internal codes.
- Use the message field for clarity. When two buttons could mean different things to the agent, give each a distinct message.
- Install skills before you reference them. Only installed skills appear in the @ list.
- Decide on data, not on descriptions. Where a fact lives in a custom field or a label, reference it with @ — the agent can check a reference; it can only guess at a description.
- Check for overlap. If two procedures keep firing on the wrong messages, tighten their descriptions or add negative examples.
- Test before you deploy. The playground shows which procedure matched and whether quick replies were offered — use it after every significant change.
Troubleshooting
Quick replies never appear
Check these in order:
- Does the procedure have a Quick replies entry? Skills, steps and notes alone won't offer buttons.
- Is the description specific enough? Vague descriptions rarely match confidently.
- Do two procedures overlap? The agent may skip both rather than pick the wrong one.
- Did you deploy? Playground testing is safe, but customers only see deployed versions.
The wrong procedure keeps matching
Two descriptions are probably too similar. Open both procedures side by side, find a message that's matching the wrong one, and narrow the other description so it no longer applies. Add negative examples to the procedure that shouldn't fire.
A procedure never matches when it should
- Rewrite the description as a full situational sentence.
- Add positive examples using the exact phrases your customers send.
- Compare against your other procedures — another one may be winning the match.
The skill I want isn't in the list
Go to Intelligence → Skill Sets, install the skill set that contains it and configure any required settings, then return to the Procedures tab. It will appear in the @ list once it's available.
I can't add another entry
A procedure holds up to 15 numbered positions and up to 10 notes. The two are counted separately, so running out of steps doesn't stop you adding a note.
If you're at the limit, remove what you no longer need, or split the scenario into two procedures.
I can't add another quick reply
One Quick replies entry holds up to 10 replies. Across a whole procedure, only the first 10 replies you wrote are offered to customers — several entries that add up to more than ten will lose the extras.
Remove replies you no longer need, or split the scenario into two procedures.
Procedures you wrote earlier
Nothing to migrate by hand. A procedure written when instructions, steps, quick replies and skills were separate areas opens as one list: its old prose appears as notes at the top, then its steps, then its skills and quick replies at the end — because those three never had a position of their own.
Nothing is lost. Move them to where they belong in the flow and save.